How to Take Screenshot in Windows 8.1
Taking screenshots is very simple, however, taking good screenshots with accurate and clear markings takes a bit of effort and some right techniques. While we are covering the methods of how to take screenshots in Windows 11/10, we will also be talking about some tools which may help you take good and accurate screenshots. For instance, in Windows 11/10/8.1, you can press Win+PrnScr to take a snapshot of your screen and save it into the Screenshots folder of your Pictures library.
How to take a screenshot in Windows 11/10
You can take screenshots on Windows 11/10 using the following ways:
- PrtScr key to capture & save to clipboard
- WinKey+PrtScr to capture the whole screen and save it as a file
- Alt+PrnScr to take a screenshot of any one active window
- Win+PrtScr to capture the whole screen
- Win+Shift+S to open the snipping toolbar
- WinKey+Volume down keys on Windows tablets
- Snipping Tool
- Microsoft Snip
- Charms Bar
- XBox app Game Bar
- Snip & Sketch app
- Freeware screen capture tool.
Let us take a look at them in detail.
1] PrtScr/Prt Sc/PrntScrn/Print Screen Key
This is one of the most common methods used by Windows users to take screenshots. The key usually resides in the topmost row on your keyboard.
If you simply press the PrtScr key, the screen will be captured and saved to your clipboard. You can then paste it wherever you want, like Paint, Word document, etc. To take screenshots, you just need to open the page you need the screenshots of and hit the PrtScr key. The next step is to open the MS Paint, right-click, and hit Paste tab, or you can just press CTRL+V. Your screenshot is ready, save it in the desired location.
To take a screenshot of any one window, click the window to make it active and press Alt+PrntScr. You can now paste it anywhere you want.
If some software is blocking you from using PrtScr, you may try Ctrl+PrtScr.
TIP: You can make the PrtScr key open Screen Snipping Tool to copy a region of your screen
2] Win+PrtScr
This is something not really known to many Windows users. A combination of Win+PrntScrn keys automatically captures your screen and saves it in a folder named Screenshots on your PC. This is one of the handiest ways to get the screenshots real quick.
To capture the whole screen at once, you need to just press WinKey+PrtScr or WinKey+Fn+PrtScr key combination on the hardware keyboard. While capturing screenshots, your laptop will dim, and then you can find the screenshot captured in the User/Pictures/Screenshots folder.
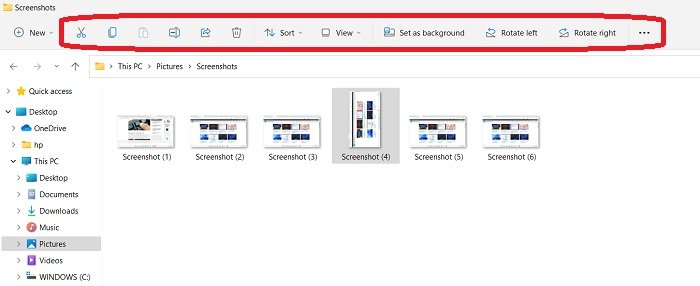
You can check your screenshots in the %UserProfile%\Pictures\Screenshots folder. Remember this folder is not created until you use Win+PrntScrn once. You can, however, relocate the folder. Just right-click on the Screenshots folder and open Properties where you can change the output location.
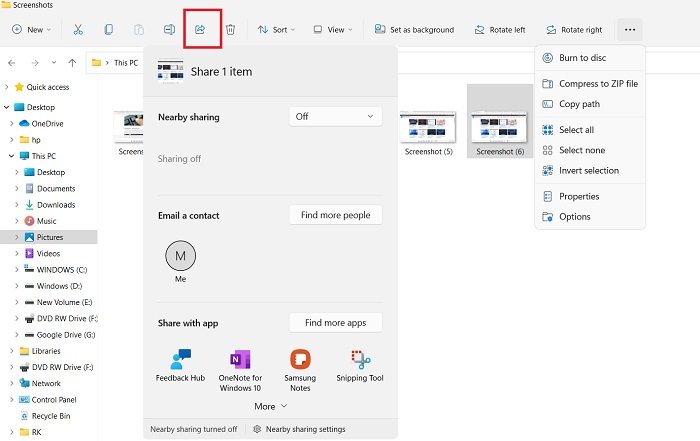 Furthermore, you can do a lot more to your saved screenshots directly from this folder. You can cut your screenshot, copy, rotate, set it as a background, compress, etc. right from the folder itself. Also, you can share it directly from here. Click on the Share icon as shown in the screenshot above and share it.
Check this post if you find that for some reason your Windows is not saving captured Screenshots in the Pictures folder.
3] Alt+PrtScr to take a screenshot of any one active window
Press Alt+PrtScr if you want to take a screenshot of any one active window. This method will capture only the active windows and not the entire screen. This means if you have any pop-up window open over a webpage and you press Alt+Prt Sc keys it will capture only the pop-up window and not the entire webpage. Check out the screenshot I've shared above, here I have the Windows Start Menu open and I pressed Alt+Prt Sc and it has captured only the Start Menu and not the entire desktop.
4] Win+PrtScr to capture the whole screen
Pressing Win+PrtScr will capture the whole screen.
5] Win+Shift+S
The combination of Win+Shift+S keys on your keyboard lets you open the snipping toolbar capture a selectable area of your screen. Open the screen you want to capture and press Win+Shift+S, and the screen grays out and lets you drag the cursor and select the desired area.

This shortcut directly opens the snipping tool for you and you can take a screenshot of the whole screen or a specific region. The screenshot taken here will be copied to your clipboard which you have to paste to MS Paint or any other photo editing apps available on your PC. You can take a rectangular snip, free snip, window snip, or a full screen from here.
You can copy a selectable area to the clipboard and then paste it into MS Word or MS Paint.
6] WinKey+Vol on Windows/Surface tablet
In case your Windows tablet or Surface does not have a PrtScr key, you can press WinKey+Volume down hardware buttons on the tablet, together at the same time, you will find the screenshot captured and saved in your Pictures/Screenshots folder. You can read more on how to take screenshots on Surface.
7] The Snipping Tool
Windows 10
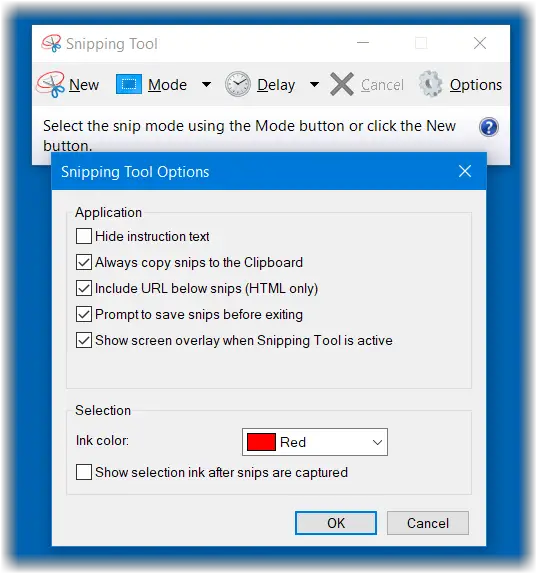
The Snipping Tool has been a Windows component for long. It was launched with Windows 7 and is continued. This is a very simple tool that lets you capture a selected area of the screen and save it directly as an image file.
- To use the snipping tool, open the screen you want to capture first and then open the tool.
- In your Windows Search, type Snipping Tool and choose the Mode and Delay and click on New.
- Use the cursor to select the screen area.
- Click on the Save icon and save the image to the desired location.
- The tool also offers some editing tools like pen, rubber, and highlighter.
Windows 11
In Windows 11. our old and classing Snipping Tool has got a new look with the new operating system. With this built-in screen capturing tool in your Windows PC, you can capture a specific region as per your requirements.
Click on the Search tab in your taskbar and type Snipping Tool, open the application, click on Newand it will open a tab where you can select the shape you want to capture.
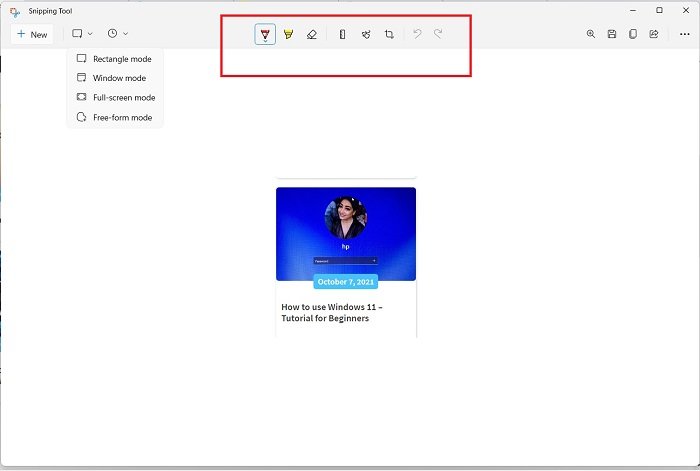
Once you are done selecting the area, it will be capture in the application itself and then you can mark, highlight, pen writing, crop, copy, etc on your screenshot from here.
8] Microsoft Snip

Microsoft Snip Screen Capture Tool is the latest tool offered by Microsoft Office which helps you taking screenshots quickly and easily. The tool is very helpful for users who need to take screenshots very regularly.
You need to download and install this Snip Screen Tool on your PC. Once installed the tool sits on your screen always letting you take the screenshots instantly. This is an intuitive tool and comes with powerful features that help you take real good screenshots. Learn how to use this new.
9] Using Share Charm in Windows 8.1
Windows 8.1 also adds the ability to take a screenshot from the Share charm. But this is useful, only if you want to share it with someone. It will not directly save the screenshot in any folder.
Open the Charms bar and click on Share. You will have the option to share the screenshot with some of your Windows Store apps that support this feature. If you need to mail the screenshot, you can select Mail, for instance.

Clicking on the app will take a screenshot of the desktop or the active app.
10] Using Game Bar

The XBox app in Windows 10 Creators Update and later can use the Game Bar to take screenshots of the active Game window. Press Win+Alt+PrtScn to take and save the screenshot of the Game window.
11] Snip & Sketch app
You can use Snip & Sketch app to Capture and Annotate screenshots in Windows 10 v1809 and later.
12] Using third-party freeware
There are also some cool free Screen Capture software for Windows that you may want to check out.
Apart from letting you take a desktop screenshot on Windows, these free software offer many more options and features.
BONUS TIP: This post shows how to take a screenshot of the Lock Screen & Login Screen in Windows 10.
Go here if you need to find out how to add a Device frame to a screenshot.
How to Take Screenshot in Windows 8.1
Source: https://www.thewindowsclub.com/desktop-screenshot-on-windows-8-1
0 Response to "How to Take Screenshot in Windows 8.1"
Post a Comment